How to Make an Easy Phoneme Wall in Small Spaces
I have a confession to make: sometimes I have “classroom envy.”
A couple of years ago I saw a colleague’s post on FB showing their “phoneme wall,” or some teachers might call it a “sound wall,” that spanned one side of their classroom.
What is a Phoneme Wall?
Across the top were the “sounds,” or phonemes, and below were single letters and digraphs to spell those phonemes. Eager students suggest examples of spellings for a phoneme.

It’s an effective visual reminder. Later when students are writing, they can review their spelling options for /eɪ/ (long a) or /k/.
In English, we have about 44 phonemes. Linguists don’t agree on the number. It’s still a lot of phonemes. How could I make room for 40+ phoneme columns?
Searching Pinterest
Searching Pinterest, I found classroom ideas, but nothing was workable in my space. Sigh. I gave up. My students used 3-ring binders with pages for phonemes and their spellings. Functional but lots of flipping pages.
Besides the space problem, tutors see multiple students who are each on their own progression. One wall is not enough.

I wanted the Tutoring Fairy Godmother to wave her wand to let me have it all in less space.
If I just had a phoneme wall, students could quickly glance at their phoneme wall and remember the <ew>, <oo>, or <u> and consider which of those would work best in the spelling.
Inspiration
One day, I saw an idea for hanging Christmas cards on cabinet doors.
This got my wheels turning. How could I use this to create quickly interchangeable and individualized phoneme walls?
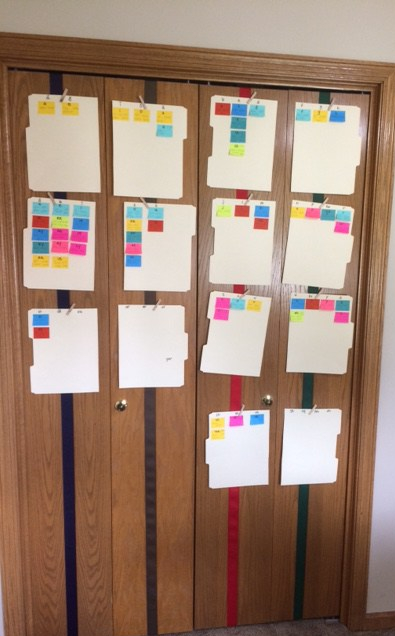
Eureka! With some ribbon, clothespins, and manila folders, the closet doors in my tutoring office are now home to each student’s phoneme wall.
It was so easy. Here’s how I did it.
Materials
- 4 strips of 15’ of 1 ½” grosgrain ribbon (probably longer than you need but I didn’t want to run short)
- 1 ¾” clothespins
- Manila file folders
- Sticky notes
- Black marker
1. Measure your closet door height, double, and add 8-12 inches to allow for the top and bottom and enough to tie a knot.
Dust the top of your closet doors!
(If your closet doors are anything like mine, there’s a ton of dust on top of the door panels. Dust first so it’s not on the ribbon.)
2. Cut the ribbon. I cut the four ribbon lengths to 15 feet each. Yours may be different depending on where you’re hanging this.

3. Slip the ribbon over the door and under so the cut ends are in the front of the door. It’s easier to tie the knot at the panel front than from inside my small closet.
Check to be sure the ribbon is flat and not twisted on both the front and back of the door. Tie the cut ends into a knot as close to the door panel as possible and then with the door open slide the ribbon so the knot goes to the back side of the door.
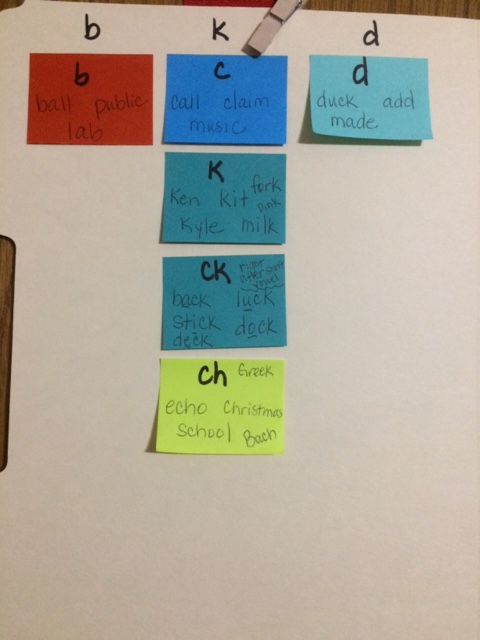
4. Make folders with the phonemes across the top. These can be arranged according to your teaching methods. Mine have short vowel phonemes on one folder. Another one has long vowels with a little extra room for long u because it has so many graphemes (letters or digraphs). It took several folders to finish with consonants, etc. I made one set to plan how it all fits.
Sticky notes can be made ahead of time. I prefer making them as we brainstorm example words together.
Phoneme Example Words
The example words can be chosen to show a grapheme’s position in a word, whether it’s initial, medial, or final.
B with bike, robin, & grab
AI with aim & nail
EE with eel, seed, & tree
5. Attach the folders, or the folder halves (if you decide to cut them in half), to the ribbon with clothespins. It’s quick and easy to change between students.
Phoneme Wall Folder Tips
- Use the side of the folder without the manufacturer’s mark.
- Avoid the fold line. Sticky notes on the fold line will fall off when you fold them to store between sessions.
- Cutting them in half makes them fit on the door panel, allowing you to still open the closet.
My students like it better than the flipping through their binder. Win-Win.
Woohoo! Wishes do come true! It works so well—great visual, always in front of us, showing what we have studied and that there is more to learn.
After sending pictures to the mom of one of my online students, she’s putting together one for her daughter to use during her remote sessions.
Problem solved: My classroom wall envy is gone, the phoneme walls are made and reusable, and I did it without the Bippity-Boppity-Boo!